

Nail Design with Lines: Ideas, Techniques and Tips for Clean, Modern Nails
A nail design with lines is one of those looks that seems effortless on someone else’s hands and slightly terrifying on your own. One thin stripe, a crisp grid, a loose wavy squiggle: lines can be quiet and minimal or loud and graphic, and that range is exactly why they keep coming back, season after season.
Here is the good news. You do not need salon training, a surgeon’s steady hand or a drawer full of expensive gear to pull off nails with lines. You need the right brush, polish at the right consistency, a handful of small tricks and a little patience. This guide covers all of it: the tools, the techniques, more than 40 line nail design ideas sorted by style, advice for different nail shapes and occasions, the mistakes nearly everyone makes (and how to fix them), and how to make the whole manicure last.
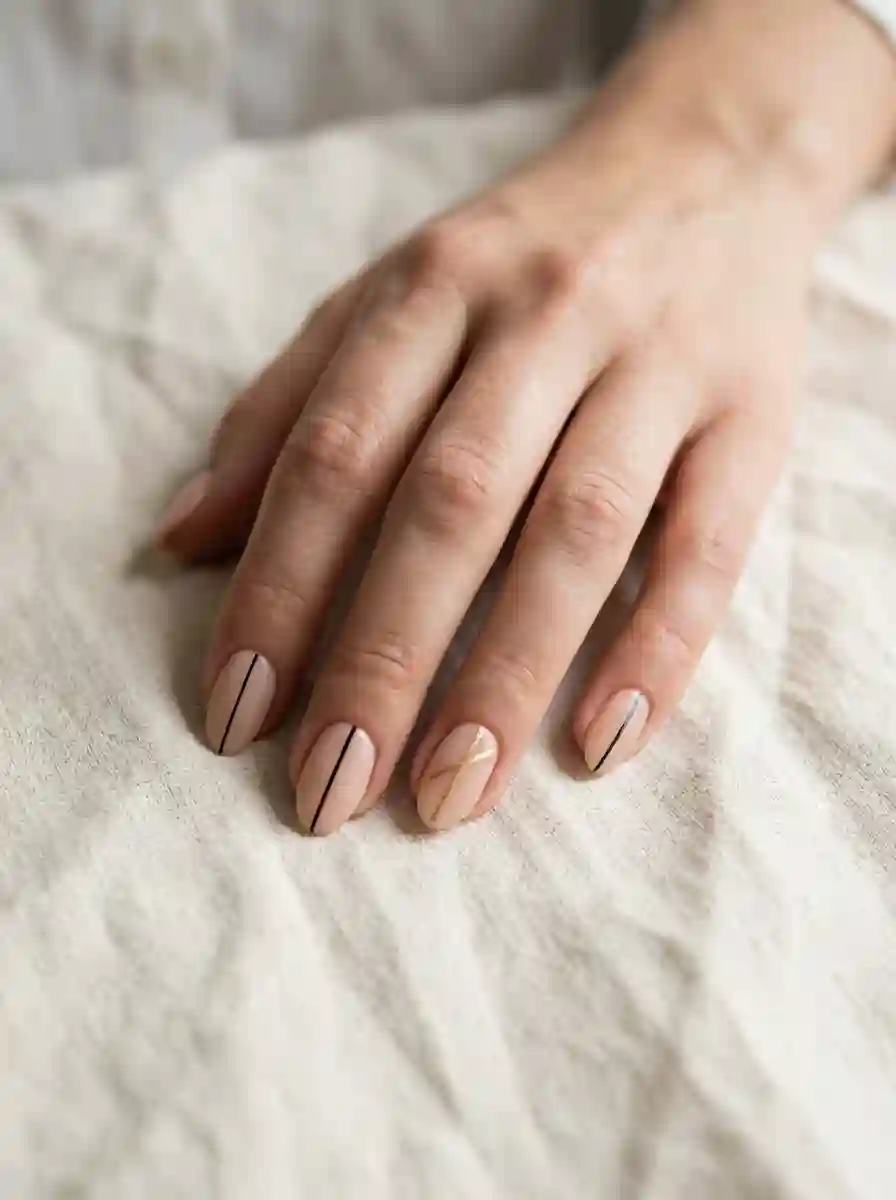
Whether you want one subtle accent line for the office or a full geometric statement for the weekend, there is something here for you.
Also Read : Neon Orange Nail Ideas: 35 Bold Designs, Shade Tips and Pro Tricks
What Counts as a Nail Design with Lines?
In the simplest terms, a nail design with lines is any manicure where straight, curved, wavy or crossing strokes are the main decorative element. That covers a surprisingly wide territory:
- A single hairline stripe running across a bare nail
- Parallel stripes in two or three colors
- Grid, plaid and checkerboard patterns built from crossing lines
- Chevrons and zigzags
- Negative space designs where lines frame bare nail
- Loose, abstract squiggles that look hand-sketched
- Micro French tips and double French lines
- Metallic foil or chrome lines on top of a solid base
You will also see the same idea called line nail art, striped nails, linear nail art or minimalist nail art. The names change, but the core idea does not: you are using line to create shape, rhythm and contrast on a very small canvas.
What makes it so appealing is how forgiving the concept is. A line does not have to be perfect to look intentional. A slightly imperfect hand-drawn stroke often looks more fashionable than a mechanically straight one, which is great news if your hands are not exactly steady.
Why Lines Work So Well on Nails
There are a few practical reasons line designs have real staying power, and they are worth knowing before you pick a style.
Lines change how nails look. Vertical lines draw the eye up and along the nail, which can make fingers look longer and slimmer. Horizontal lines add width and a graphic feel. Diagonals add movement. Knowing this lets you pick a design that flatters your hands instead of fighting them.
They suit every level of effort. One line on one nail takes about two minutes. A full geometric pattern takes an evening. You can scale the design to the time you have.
They pair with almost anything. Lines sit happily on top of a nude base, a bold color, a sheer jelly, a chrome finish or a French tip. They also combine well with other elements like dots, glitter, flowers and gradients.
They grow out gracefully. Minimalist line designs, especially negative space ones, hide regrowth far better than a solid glossy color. That makes them a smart choice if you want your manicure to look good for two or three weeks.
They are budget friendly. A thin brush and a bottle of top coat will take you a long way. If you already own a few polishes, you can start today.
Tools and Materials for Line Nail Art

You can make lines with a surprising range of tools. Some are professional. Some are sitting in your kitchen. Here is what actually matters.
Striping brushes and liner brushes
A striping brush has long, thin bristles that hold a good amount of polish and release it in one smooth, continuous pull. This is the tool most nail artists reach for when they want long, clean lines. Length matters more than you would expect: a longer brush holds more product, which means you can draw an entire line without stopping to reload.
A shorter detail brush gives you more control for small, intricate lines, such as fine crosshatching or tiny geometric details. If you only buy one, get a long thin striper. If you buy two, add a short detail brush.
Nail art pens and polish pens
These work like a marker. They are brilliant for beginners because you control pressure just like you would with a pen. The trade-off is that the lines are usually a little thicker and the color range is more limited. They are great for quick accents, doodles and abstract designs.
Striping tape
This is a thin, adhesive tape sold in rolls, usually in metallic gold, silver and sometimes black or white. You can stick it directly on dry polish for instant perfect lines, or use it as a guide for painting around. If you want ruler-straight geometry without any steady-hand skills, tape is your friend.
Dotting tools and toothpicks
A dotting tool is not only for dots. Dragging the tip through a bead of polish makes short, even lines, and a plain toothpick works nicely for tiny details and for cleaning up edges.
Polish
Consistency is everything. Polish that is too thick drags and leaves lumpy, uneven lines. Polish that is too thin runs and bleeds. Look for formulas that are creamy and opaque in one pass. Many brands make dedicated nail art polishes with thinner bottle brushes or pot-style formulas designed for lines. If your polish has gone gloopy, a drop or two of nail polish thinner (not remover) will bring it back.
Gel polish and builder gel
Gel is wonderful for line work because it will not dry until you cure it, so you can take your time, wipe away mistakes and adjust. Thicker gel art paints hold a crisp line without spreading, which is why many salon technicians prefer them for fine detail.
Top coat
A quality top coat seals the design, adds shine and smooths out the tiny ridge that lines create. Use a generous layer, and see the tips below on avoiding smudged lines.
Cleanup tools
A small flat brush or a cotton swab dipped in remover, or an angled cleanup brush, fixes edges and mistakes. Keep a small dish of remover nearby. You will use it more than you think.
A palette
A scrap of foil, a plastic lid or a piece of baking parchment works perfectly. Put a small bead of polish on it, load the brush from there and you will avoid dipping back into the bottle and flooding the bristles.
Must Read : Light Pink Chrome Nails: 16 Ideas, a Shade Guide and Exactly How to Get the Look
Prep Work: The Step Everyone Skips
Line designs show every flaw underneath them. A bumpy surface, an oily nail plate or a dull base will make even the best lines look messy. Spend five extra minutes here and the rest gets much easier.
- Shape and tidy. File your nails to your preferred shape and push back cuticles gently. Clean cuticle edges make negative space designs look sharper.
- Buff lightly. A very light buff removes shine and ridges so polish adheres evenly. Do not over-buff, especially on natural nails.
- Cleanse. Wipe each nail with remover or an alcohol wipe to strip away oils. Oil is the number one cause of lines that bead up and refuse to stay put.
- Apply base coat. This protects your nails from staining and gives polish something to grip.
- Paint your base color. Two thin coats beat one thick coat every time. Let it dry fully before drawing any lines. If you are using regular polish, wait at least ten minutes. Drawing on tacky polish drags the base color and ruins your stripes.
- Optional: add a thin layer of top coat. Painting lines on a very thin layer of dried top coat gives you a slick, glass-like surface that lets the brush glide. It also means that if you make a mistake, you can wipe the line away without disturbing the color underneath.
That last trick alone is worth remembering. It is one of the most useful secrets in line nail art.
Core Techniques: How to Draw Lines on Nails
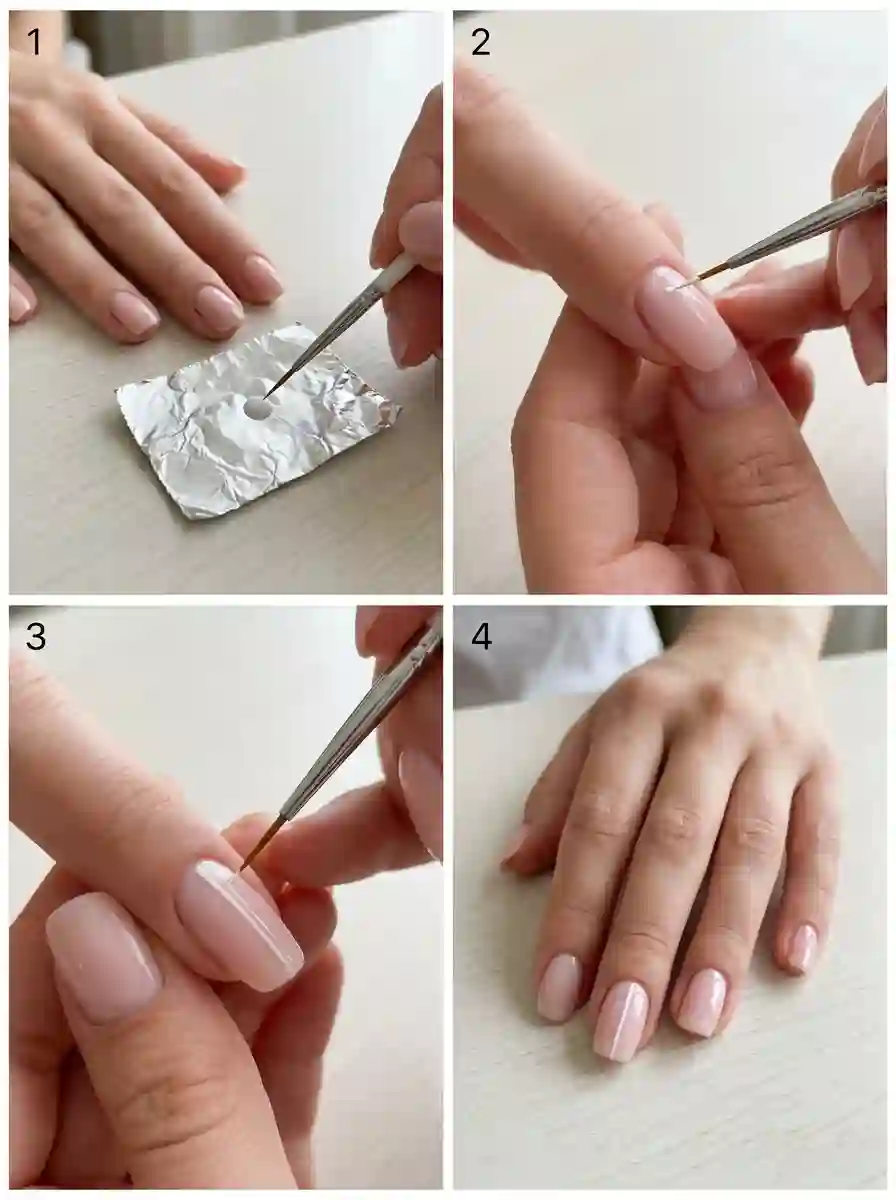
There is no single correct method. Different techniques suit different designs and different hands. Try a few and keep whichever feels natural.
1. Freehand with a striping brush
This is the classic approach and the one that gives you that relaxed, hand-drawn look.
- Put a small bead of polish on your palette and roll the brush through it until the bristles are loaded but not dripping.
- Rest the side of your painting hand on the table or on a stack of books. Stability comes from your wrist and pinky, not from holding your breath.
- Place the brush at the start of the line, then pull it toward you in one smooth, confident motion. Lift off at the end.
- Do not press hard. Let the bristles do the work. Heavy pressure splays the brush and makes thick, uneven lines.
It helps to move your nail rather than your brush. Try keeping the brush still and rotating or sliding the finger you are painting.
2. The pull technique for ultra-fine lines
For hairline stripes, wipe most of the polish off the brush on the edge of your palette so only a thin film remains. Touch down lightly, then drag. The less product on the brush, the thinner the line. Reload often. A dry brush will skip.
3. Striping tape
Tape is the foolproof option for straight, crisp lines.
- Make sure your base color is completely dry.
- Peel a short strip and lay it on the nail with tweezers. Press down gently with an orange stick.
- Trim the ends against the edge of the nail with small scissors or a craft blade.
- Seal with top coat, taking care to cover the tape edges completely so they do not lift.
Another way to use tape is as a mask. Stick the tape on dry polish, paint over it, then peel it off while the top color is still slightly wet. This leaves a clean negative-space line in the base color.
4. Nail art pens
Hold the pen like a normal writing pen and draw. Pens suit beginners because pressure and direction feel intuitive. Practice on your thumbnail or on a piece of paper first to get the flow started. Let the line dry before sealing, as the polish in a pen is often thicker than regular polish.
5. Dotting tool or toothpick drag
Place a small bead of polish where you want the line to start and drag the tool through it. It works well for short, slightly tapered lines and for details like tiny crosshatches.
6. Nail stamping
Stamping plates with line patterns, such as grids, stripes, waves and geometric shapes, give you a repeatable, precise design with no brush skills required. You scrape polish across an engraved plate, pick up the design with a stamper and press it onto your nail. It is a great way to get complicated patterns, though it takes some practice to get clean transfers.
7. Gel line work
With gel polish, load a thin brush with a gel art product and draw your lines. Because gel does not dry on its own, you can correct mistakes with a cleanup brush and cure only when you are happy. For very crisp lines, many technicians flash-cure each line briefly before adding the next, according to the manufacturer’s instructions for their lamp and product. A quick cure holds the line exactly where you drew it and stops it spreading into the next one.
Practice before you commit
Before doing your nails, spend ten minutes drawing lines on a nail practice sheet, a piece of paper or a plastic swatch. Draw straight lines, curved lines and wavy lines. Draw them thick, then thin. It warms up your hand and teaches you how much polish your brush really needs.
Read Also : Winter Nail Designs That Will Transform Your Hands Into The Coziest Accessory Of The Season
Nail Design with Lines Ideas, Part One: Simple and Minimal

Start here if you are new to line nail art or want something wearable for every day.
1. The single accent line
One thin line, drawn across the nail from tip to base, on a nude or sheer pink base. It is the simplest possible line design and it looks elegant on every length. Try black for graphic contrast, gold for warmth or white for a soft, clean effect. Place it off-center for a more modern look.
2. Parallel vertical lines
Three or four evenly spaced lines running from cuticle to tip. These lengthen the nail visually and look polished in tonal colors, for instance beige lines on a cream base, or deep burgundy lines on a soft pink one.
3. Horizontal stripes
Breton-style stripes in navy and white are an all-time classic. Keep the lines evenly spaced and consistent in width. For a more subtle effect, use two shades of the same color, such as light and mid blue.
4. Diagonal lines
A diagonal line or two creates movement and adds energy without clutter. Try a single diagonal from one corner of the nail to the other, or a pair of parallel diagonals in contrasting colors.
5. Micro French with a line
A classic French tip made much thinner, with a hairline of white, beige or even a color pop at the free edge. Add a second ultra-fine line just above it for a double French look. It is polished, quietly fashionable and easy to wear to work.
6. Side line French
Instead of painting the line across the tip, draw it along the sidewall of the nail, following the curve. It frames the nail and looks surprisingly modern.
7. The half-and-half nail
A straight line divides the nail into two blocks of color, either horizontally, vertically or on a diagonal. A nude and white pairing is crisp and clean. A bold pairing, like cobalt blue and lime, feels playful.
8. Cuticle line
Paint a thin curved line following the shape of the cuticle, leaving a tiny gap of bare nail between the line and the skin. It makes nails look longer and cleaner and gives a barely-there sophistication.
9. Pinstripe tips
Place a fine line of color right at the nail tip, and add one more a few millimeters above it. The effect is subtle and clean, and it looks great on short, squared nails.
10. Tone-on-tone lines
Choose a base and paint lines in a slightly darker or lighter shade of the same color. The result is understated, textural and luxurious. Think mocha on tan, or sage on pale green.
Nail Design with Lines Ideas, Part Two: Geometric and Graphic
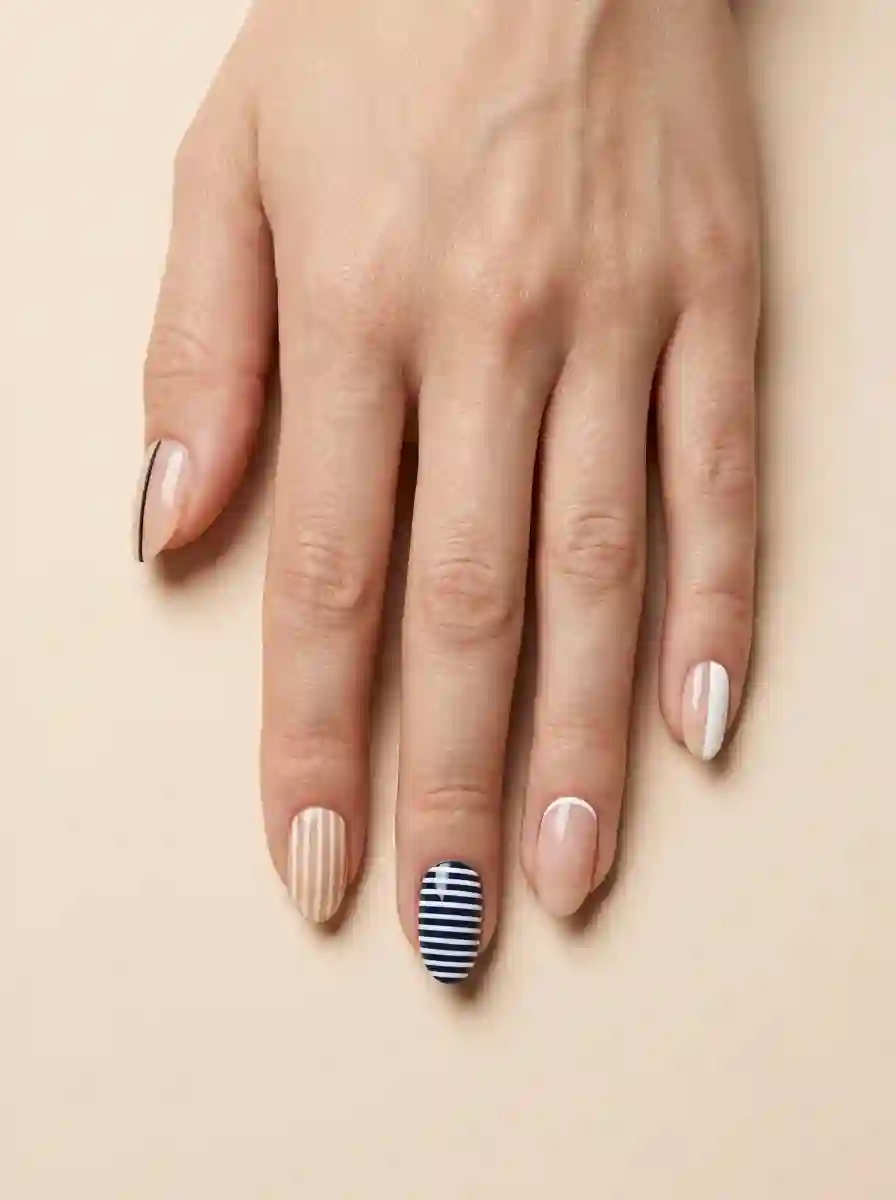
When you are ready to turn up the volume, geometry is where line nail art really shines. These designs look intricate, but most are just a few simple strokes repeated.
11. Grid and checkerboard lines
Draw evenly spaced vertical lines, then cross them with horizontal ones. The result is a clean grid that looks like graph paper or a tiny window pane. Choose a soft base with a dark grid for a minimalist look, or a bold base with a white grid for a streetwear feel. For a checkerboard, fill alternate squares with a second color.
12. Plaid and tartan nails
Plaid is simply layered lines of different thicknesses and colors. Start with a base, add a few wide translucent stripes, then cross them with thin dark ones. It is a favorite for autumn and winter. Do not worry about perfection; plaid looks charming when it is slightly imperfect.
13. Chevron and zigzag lines
Paint a series of V shapes stacked down the nail, or one dramatic zigzag across the center. Chevrons look especially sharp when the lines are very thin and the base is a solid, glossy color.
14. Triangles and angular shapes
Two or three straight lines that meet at sharp angles can create triangles, diamonds and abstract shards. Fill some of them with color for a stained-glass effect, or leave them as pure outline for a cleaner look.
15. Crosshatch lines
A set of diagonal lines crossed by a second set creates a woven look. Use two shades of the same color for a tailored effect, or contrast metallic gold on black for something dressy.
16. Color-block lines
Split the nail into sections with straight lines, then fill each section with a different color. Keep the palette limited, ideally three colors, so it feels intentional rather than chaotic. Black outlines between the blocks give a bold, graphic, almost Mondrian-inspired result.
17. Concentric lines
Draw lines that echo the shape of the nail, one inside the other, like ripples. Thin outlines in graduated colors look dreamy. Because the lines follow the natural curve, this style tends to flatter almond and oval shapes.
18. Lines meeting at a point
Draw several lines fanning out from a single point at the cuticle or the tip, like sun rays. It looks dynamic and slightly retro, and it works well with warm colors like coral, mustard and cream.
Nail Design with Lines Ideas, Part Three: Negative Space
Negative space designs use the bare nail, or a clear base, as part of the pattern. They feel airy, modern and a little architectural. They also hide regrowth beautifully, so they are brilliant if you want your manicure to last.
19. The classic negative space stripe
Paint a base color, then leave a thin strip of bare nail down the middle or along one side. Frame it with lines for a sharp, graphic look.
20. Negative space half moon
The half moon (lunula) shape is left bare at the base, then outlined with a thin curved line. It is a vintage idea that keeps coming back for good reason: it looks elegant and feels fresh at the same time.
21. Negative space corners
Paint thin lines that outline two edges of the nail, leaving a square or rectangle of bare nail in the center. Fill with a sheer polish or leave it fully bare for the lightest possible effect.
22. Floating lines
Draw several lines that stop short of the cuticle and sidewalls, so they appear to float on a clear nail. It looks delicate and takes very little product.
23. Negative space diagonal
Paint a color block that cuts across the nail on a diagonal, leaving the opposite triangle bare. Add a thin line along the edge of the block to sharpen the result.
24. Negative space grid
Draw a grid of thin lines on a clear nail, then fill in a few squares with color. It is a more playful take on the checkerboard and looks great in soft pastels.
A quick tip for clean negative space: if you are using regular polish, apply a base coat and seal the negative space areas with top coat before you paint, so any stray polish wipes away cleanly. If you are using gel, wipe the bare area with a lint-free wipe and cleanser before curing.
Also Read : Lavender Nail Designs That Prove Soft Colors Can Still Make A Statement
Nail Design with Lines Ideas, Part Four: Curves, Waves and Abstract Art
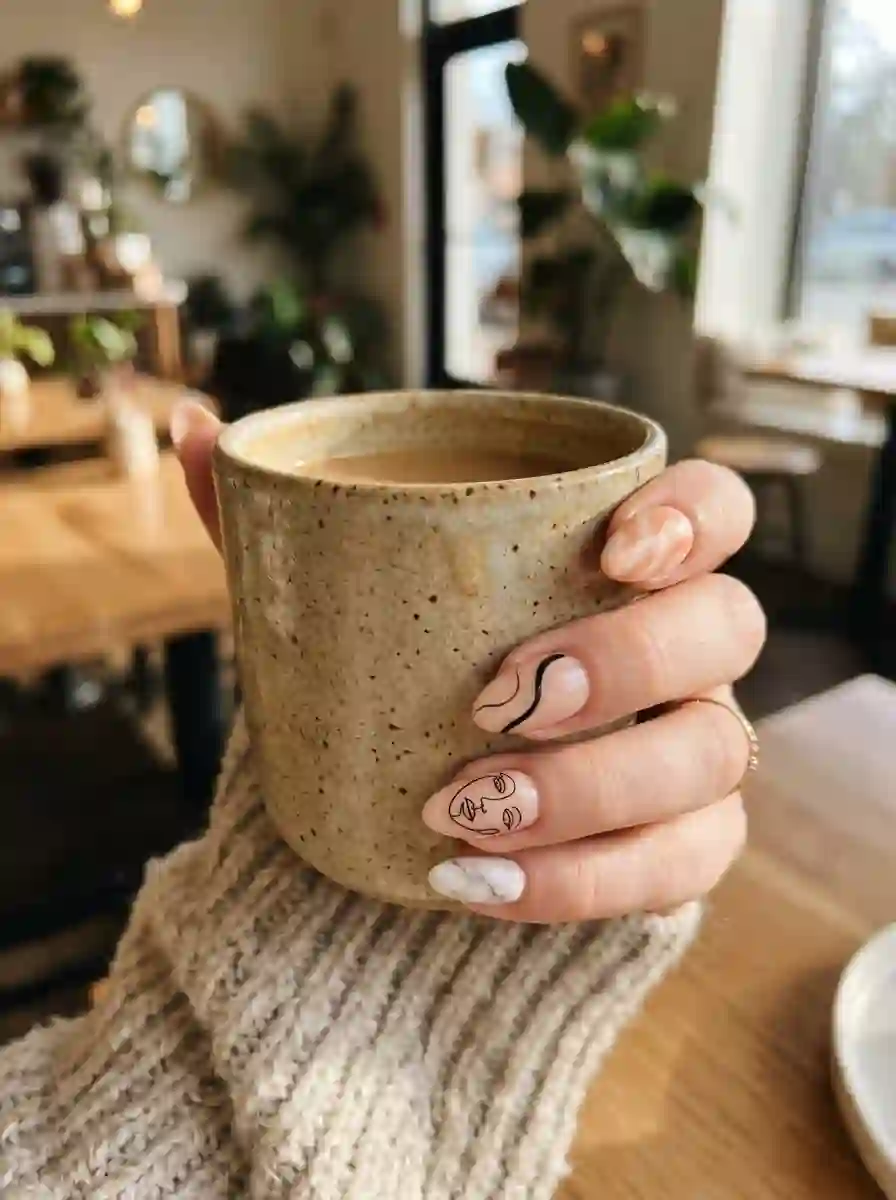
If straight lines feel too rigid, curves are the answer. These designs are the most forgiving of all because nobody expects a squiggle to be perfect.
25. Wavy lines
A set of gentle horizontal waves, like rippling water, is one of the most popular line designs for a reason. It looks fun and relaxed and works on any nail length. Use two colors that contrast softly, such as cream on peach or sky blue on white.
26. Single swirl
One loose swirl or loop on an accent nail. It is a quick way to add personality to an otherwise plain manicure.
27. Abstract face or figure lines
Continuous line art, where a single unbroken line suggests a face, a hand or a flower, has been enormously popular in nail art. Use a fine brush and keep the line fluid. Black on a nude base gives the cleanest look.
28. Intersecting curves
Draw two or three curved lines that cross each other and overlap, creating a flowing, organic shape. Fill selected areas with color for a more painterly effect.
29. Scribbled lines
Loose, free, deliberately messy scribbles in several colors give a fun, youthful feel. The trick is to keep the colors limited so the chaos stays stylish.
30. Curved French
Instead of a straight white tip, draw a deep, curved line that dips down the nail like a smile or a wave. Add a second fine line above it for extra definition.
31. Marble lines
Thin, veined lines in gray or black on a white or pale base mimic natural marble. Use a very fine brush and let the lines branch and curve naturally. Soften them with a sponge of translucent polish if you want a more blended look.
32. Heart and flower line art
Outline simple hearts, daisies or leaves with a fine line, leaving the inside bare or filled. It is a gentle, romantic way to include line work.
Nail Design with Lines Ideas, Part Five: Metallic, Glitter and Statement Lines
Sometimes a manicure needs a little drama. These ideas bring in shine and texture.
33. Gold or silver foil lines
Thin metallic lines on a deep base, such as navy, emerald or black, feel instantly dressy. Gold striping tape is the easiest route, but a metallic polish and a thin brush work just as well.
34. Chrome lines
A mirror-finish chrome powder applied over lines (or over a base with tape peeled away) gives a futuristic, silvery shine. It is a bold look that suits long, bold nails.
35. Glitter lines
Run a line of fine glitter polish down the center or along the edge of the nail. It is a lighter way to add sparkle than a full glitter nail.
36. Raised or 3D lines
With builder gel or thick gel art paint, you can create lines that sit slightly above the surface. They add texture you can feel as well as see. Because they are raised, they should be sealed carefully with top coat to avoid snagging.
37. Neon lines on a dark base
Bright, fluorescent lines on black or deep navy look electric and eye-catching. A good fit for summer evenings, festivals and anything that calls for a bit of fun.
38. Holographic or iridescent lines
A fine line of holographic polish shifts color in the light, adding a touch of magic to an otherwise simple design.
39. Ombre lines
Combine a soft gradient base with a few crisp lines over the top. The contrast between soft and sharp is lovely, and a gradient is a great way to hide small imperfections underneath.
40. Skittle lines
Give every nail a different line design, but keep one element constant, like color or line thickness, so the whole set feels cohesive. It is a playful way to try several techniques at once.
Choosing Lines for Your Nail Shape and Length
Any line design can work on any nail, but some combinations feel especially natural.
Short nails. Vertical lines and thin stripes elongate. Negative space designs also make short nails look longer. Keep lines thin and avoid clutter. A bold design is fine, just give it breathing room.
Medium nails. You have the most freedom here. Almost any design works, from grids to waves.
Long nails. Long nails give you a big canvas for detailed work: layered geometry, plaid, abstract art and chrome lines all look striking. Diagonals can add drama.
Square nails. Their clean edges suit grids, color blocks and straight lines. Sharp geometry looks especially crisp.
Round and oval nails. Soft curves, concentric lines and waves feel like a natural fit because they echo the nail’s shape.
Almond nails. Vertical lines and curved lines flatter the tapered shape. Fine lines tracing the almond outline look particularly graceful.
Coffin and ballerina nails. The flat tip is perfect for a clean horizontal line or a French variation. Angular geometry is dramatic on this shape.
Stiletto nails. Fine vertical lines that follow the point lengthen the look even more. Keep detail delicate so it does not feel crowded.
Read Must : Tropical Nail Art: 20 Ideas, Step-by-Step Tutorials and Pro Tips for a Vacation Manicure
Lines for Every Occasion and Season

One reason nail design with lines stays popular is how easily it adapts. Here is how to match a look to a moment.
Work and everyday. Choose neutral bases with thin lines in tone-on-tone shades, or a micro French with a hairline detail. You get polish without distraction.
Weddings and formal events. Thin gold or silver lines on a sheer pink or milky base feel elegant and photograph beautifully. A double French or a delicate half moon is a safe, graceful choice.
Date night. Deep red with black lines, burgundy with gold, or glossy black with a single metallic stripe feels confident and polished.
Summer and vacation. Bright stripes, neon lines on white, and wavy ocean-inspired lines feel playful. Think coral, turquoise, lemon yellow and crisp white.
Autumn. Plaid and tartan nails in rust, olive, mustard, chocolate and cream suit the season perfectly. Gold lines on a warm brown base also feel cozy.
Winter and holidays. Deep green with gold lines, navy with silver, and white with icy blue grids feel festive without being kitschy.
Spring. Pastel stripes, soft wavy lines and floral line art in lilac, mint, butter yellow and baby pink feel fresh.
Color Combinations That Make Lines Pop
Color choice can make or break a line design. These pairings are reliable.
- Black and white. Timeless and graphic. Works with every style.
- Nude and black. Modern, minimalist and flattering on every skin tone.
- Nude and gold. Warm and elegant, ideal for formal occasions.
- Navy and white. Fresh, nautical and crisp.
- Burgundy and cream. Rich, cozy and sophisticated.
- Sage green and ivory. Calm, earthy and gentle.
- Cobalt blue and lime. Bold and playful.
- Pink and red. Romantic, vibrant and a little retro.
- Charcoal and silver. Sleek and urban.
- Lilac and white. Soft and dreamy.
A rule of thumb: make sure there is enough contrast between your base and your lines. If the lines will be thin, the contrast should be stronger. Low-contrast pairings, like beige on cream, work best when you want a subtle, textural effect.
Matching skin tone. Warm skin tones often look lovely with golds, corals, olives and warm browns. Cool undertones tend to suit silvers, blues, lilacs and berry shades. That said, treat this as a starting point rather than a rule. If you love a color, wear it.
Common Mistakes (and Easy Fixes)
Every nail artist has made these mistakes. Knowing them in advance saves a lot of frustration.
Wobbly lines. Usually caused by an unsupported hand or too much pressure. Rest your hand on the table, anchor your pinky and move the nail instead of the brush. Pull the line toward you in one confident stroke.
Lines that bead up or refuse to stick. Oily nails or a base coat that has not fully dried are the usual culprits. Cleanse the nail properly and let the base dry completely.
Lines that drag the base color. You started too early. Wait until the base is dry to the touch, and consider a thin layer of top coat first.
Thick, lumpy lines. Too much polish on the brush, or polish that has thickened. Wipe excess on the palette, or thin the polish with a drop of thinner.
Lines that bleed or spread. Polish that is too thin, or gel that has not been flash-cured. Use a thicker formula or cure each line briefly.
Smudged lines under top coat. Wet top coat can drag fresh lines. Let your lines dry fully, then use a generous bead of top coat and float it over the design without pressing the brush down. With gel, cure the lines first.
A bumpy finish after top coat. Lines create a slight ridge. Apply a second layer of top coat to even out the surface.
Uneven spacing. Mark light guide dots with a toothpick or use striping tape as a guide. Draw the center line first, then work outward.
Mistakes you cannot fix. Do not panic. Dip a thin brush or cotton swab in remover, and trace the mistake gently. If the whole nail looks messy, remove it and start over. It takes two minutes and you will be faster the second time.
Making Your Line Nail Art Last
Good preparation gets you most of the way. These habits take care of the rest.
- Seal the free edge. Run your top coat brush along the tip of the nail to wrap the edge. This prevents chipping.
- Use a quality top coat. A good top coat is worth the money. Apply it generously but cleanly.
- Refresh the top coat every couple of days. A thin extra layer keeps shine and protects lines from wear if you are using regular polish.
- Wear gloves for cleaning. Water, detergent and hot dishwater break down polish quickly.
- Moisturize your cuticles. Cuticle oil keeps nails flexible and polish less likely to crack.
- Avoid using nails as tools. Opening cans and scraping labels is hard on any manicure.
- Keep the manicure fresh. Line designs look best when the lines are sharp. If the design starts to look worn, a quick touch-up is better than leaving it to deteriorate.
With regular polish, expect around five to seven days of solid wear, sometimes longer with good prep and care. Gel typically lasts two to three weeks, depending on your nails and lifestyle.
Also Read : Rose Nail Ideas: 60+ Gorgeous Designs, Shapes and Easy How-Tos for 2026
Removing line designs safely
For regular polish, soak a cotton pad in remover, press it on the nail for a few seconds and wipe gently. For gel, follow the product’s recommended removal method: lightly break the top coat shine, soak off with acetone-soaked cotton and foil, then gently push off the softened gel. Never peel or pick it off, as this takes layers of your natural nail with it. Finish with cuticle oil and a hand cream.
Salon or DIY? How to Decide
Both routes work well, and the right one depends on the design and your confidence.
Choose DIY if you want simple stripes, accent lines or a minimalist design. Beginner-friendly tools like pens and tape put these within reach of most people, and it is a good way to practice.
Choose a salon if you want intricate geometry, plaid, chrome or 3D line work, or if you simply want a polished result with less effort. Experienced technicians can create very fine, consistent lines, and professional gel systems hold detail well.
If you go to a salon, bring photos. A picture is worth a thousand words and avoids the dreaded misunderstanding. Mention preferred line thickness (hairline, medium or bold), color palette, nail shape and whether you want negative space. Ask whether the design will be freehand, taped or stamped, and ask about how long it will last. A good technician will be happy to talk it through.
Personalizing Your Look
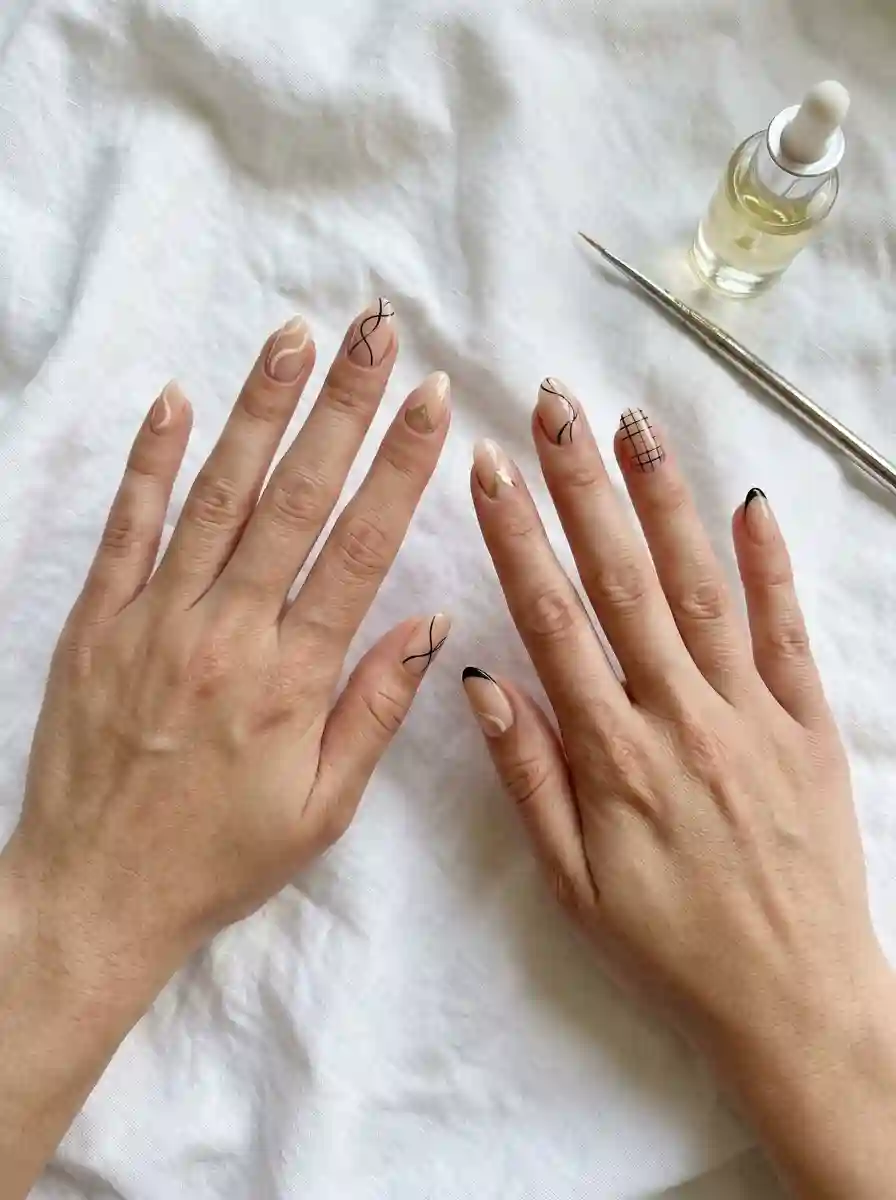
The best line nail art feels like you. Here are a few ways to make a design your own:
- Mix and match. Use one line design on your accent nails and keep the rest plain.
- Echo your outfit. Pull one color from your wardrobe into your lines.
- Play with scale. The same pattern in hairline thickness looks refined. In bold strokes, it looks graphic.
- Combine techniques. Add a few dots, a tiny gem or a spritz of glitter to a line design.
- Follow your mood. Quiet days call for tone-on-tone. Big days call for metallic and neon.
Pinterest boards, magazines and nail artists on social media can feed your imagination, but do not copy blindly. Adapt designs to your nail shape, your lifestyle and the time you have. A simple design that is done well looks better than an ambitious one that is rushed.
Final Thoughts
A nail design with lines proves that you do not need a lot to make something look great. A single stroke can change the whole feel of a manicure, and a few more can turn your nails into a miniature piece of art. Start with something small, like a simple accent line or a micro French, and build up as your confidence grows. Keep your tools simple, your polish at the right consistency and your hand supported, and remember that tiny imperfections are part of the charm.
Most of all, have fun with it. Nails are one of the easiest places to experiment with style, and line designs give you endless room to play. Pick one idea from this guide, set aside half an hour, and give it a try this weekend.
Frequently Asked Questions
1. What is the easiest nail design with lines for beginners?
The single accent line is the easiest place to start. Paint a nude or pale base, let it dry, then draw one thin line across, down or diagonally on one or two nails. Striping tape or a nail art pen makes it even easier. Once you feel comfortable, move on to parallel stripes and a simple micro French tip.
2. What tools do I need to create lines on my nails?
A long, thin striping brush is the most useful tool. Add a nail art pen, striping tape, a dotting tool or toothpick, a base coat, top coat and a small palette for your polish. A cleanup brush or cotton swab dipped in remover helps fix mistakes. You can begin with just a brush and a couple of polishes.
3. How do I get straight lines on my nails?
Rest your hand on a stable surface, load your brush with a small amount of polish and pull the line in one smooth motion toward you. Move the nail rather than the brush if that feels more natural. If you want guaranteed straight lines, use striping tape or a thin ruler-like guide.
4. Can I do line nail designs without a brush?
Yes. A toothpick, a dotting tool, a nail art pen, a polish pen or striping tape will all create lines. Even the pin end of a bobby pin can work in an emergency. A brush gives the most control and the smoothest result, but it is not essential.
5. How do I stop my lines from smudging when I apply top coat?
Let the lines dry completely, then use a generous bead of top coat and float it over the design without pressing down. Do not drag the brush back and forth over the same line. With gel, cure the lines before applying top coat, and many technicians flash-cure each line to hold it in place.
6. What colors look best for nail designs with lines?
Black on nude, white on pastel, gold on navy, burgundy on cream and navy on white are all reliable combinations. The key is contrast: thin lines need a stronger color difference to be visible. Choose colors that flatter your skin tone and suit your wardrobe.
7. How long do nail designs with lines last?
With regular polish and a good top coat, expect about five to seven days. Gel manicures commonly last two to three weeks. Good prep, sealing the free edge and wearing gloves when cleaning all help extend wear.
8. Do line designs work on short nails?
Absolutely. Vertical lines and negative space designs can make short nails look longer and slimmer. Keep the lines thin and the design simple so it does not feel crowded. Micro French tips, cuticle lines and tone-on-tone stripes are all great for short nails.


6 Comments