Disney Christmas Nails: 40+ Magical Holiday Nail Ideas You’ll Actually Want to Wear
There’s a very specific kind of joy that shows up when you glance down in December and spot a tiny pair of Mickey ears peeking out from a swirl of red and gold. It’s small. It’s a little silly. And somehow it makes wrapping gifts, standing in line at the post office and sitting through the third holiday party of the week feel a bit more like a movie.
That’s the whole charm of Disney Christmas nails. They take two things that already make people nostalgic, the holidays and Disney, and shrink them down to a canvas the size of your thumbnail. Whether you want a full-on Olaf-and-snowflake extravaganza or a barely-there hidden Mickey on a champagne gold base, there’s a version of this trend that fits your style, your skill level and your schedule.
Also Read : Fuchsia Nail Ideas: 40+ Bold Designs for Every Shape, Season and Skin Tone
In this guide you’ll find more than 40 ideas sorted by character world, plus the practical stuff most inspiration posts skip: how to pick a color palette, which nail shape suits which design, how to paint a Mickey Christmas nail step by step, what to tell your nail tech, how to keep kids’ nails safe, and how to make everything survive a week at the parks. Grab a hot chocolate and let’s get into it.

Why Disney Christmas Nails Are Having Such a Moment
Nails have quietly become one of the easiest ways to wear your fandom. A T-shirt says what you like out loud; a manicure says it quietly, and only to people who look closely. That’s part of why Disney Christmas nails work so well for adults. You can keep the look polished and grown-up, with a muted palette and one small character detail, or you can go full playful.
There’s also the nostalgia factor. For plenty of people, the Disney holiday specials, the Christmas-season parades and the movies they watched every December as kids are tied up with their happiest memories of the season. Putting a tiny piece of that on your hands is comfort in manicure form.
And then there’s the practical side. A nail design lasts two to four weeks, costs far less than a themed sweater or a park ticket, and photographs beautifully. If you’re heading to a Disney park over the holidays, or just doing a movie marathon at home, it’s a low-commitment way to join in.
One quick note before we start. Everything in this guide is Disney-inspired nail art you can paint or request at a salon. It’s about capturing the feel of the characters and their worlds: the shapes, the colors, the little visual cues. If you’re ever buying ready-made press-ons or polish with official artwork, look for licensed products from reputable brands rather than random unbranded listings.
Which Disney Christmas Nail Style Is Right for You?
Not sure where to start? This quick table matches your personality and your skill level to a style.
| If you are… | Try this style | Skill level |
|---|---|---|
| A classic Disney fan who wants the icons | Mickey and Minnie Santa hats, ornaments and bows | Easy to medium |
| Obsessed with winter and sparkle | Frozen-inspired icy chrome and snowflakes | Easy |
| A little spooky even at Christmas | Nightmare Before Christmas black, white and red | Medium |
| A romantic who loves fairytale details | Princess-inspired pastels, gold and glass-slipper accents | Medium |
| Cozy and sweet | Winnie the Pooh, Stitch and Toy Story holiday looks | Easy to medium |
| Professional or low-key | Hidden Mickeys, tiny ears, gold stars | Very easy |
| Short on time | Stickers, press-ons or a single accent nail | Beginner |
If you’re stuck, start with the last two rows. A subtle design is the fastest way to find out whether you love the look before you commit to ten themed nails.
Disney Christmas Nail Colors That Always Work
Before you pick a character, pick a palette. Color does most of the heavy lifting, and it’s what makes a design read as “Christmas” rather than just “Disney.” Here are five palettes that never fail.
1. Classic Red, Green and White
This is the Santa’s-workshop palette. Think cherry red, deep evergreen and a snowy white. It’s the natural home for Mickey and Minnie Christmas nails, since the characters’ black-and-white color scheme pairs beautifully with red. Use a sheer white or a milky base on a few nails to stop the look from feeling too heavy.
2. Icy Blue, Silver and Frost
Pale blues, silvery whites, cool lilacs and mirror chrome give you instant winter-wonderland energy. This is the palette for anything snowy, from snowflakes to a frosted-castle design. A fine iridescent top coat adds the “just snowed” effect.
3. Black, White and Blood Red
If Jack Skellington is your holiday hero, this high-contrast palette is yours. Add thin pinstripes, tiny spirals and a single hit of red and you’re halfway there. It’s dramatic, a little gothic and surprisingly wearable.
4. Blush Pink, Pale Blue and Champagne
Soft, dreamy and very fairytale. These shades suit princess-inspired nails, glass-slipper accents and anything with a sparkly finish. If you want something pretty rather than loud, this is the one.
5. Gold, Cream and Deep Burgundy
The grown-up palette. Gold foil, creamy neutrals and a rich wine red feel like a holiday dinner at a castle. Pair them with a single tiny Mickey silhouette and you’ve got an outfit-ready manicure for work, church or a fancy dinner.
A small tip from the way nail artists usually plan sets: choose one main color, one supporting color and one metallic. Three tones are enough. Anything more and the characters get lost.
Also Read: Sweater Nail Design
Mickey and Minnie Christmas Nails (8 Ideas)
If Disney has a logo, it’s those two round ears. That’s good news for anyone painting at home, because a Mickey head is just three circles. Here are eight ways to use it.
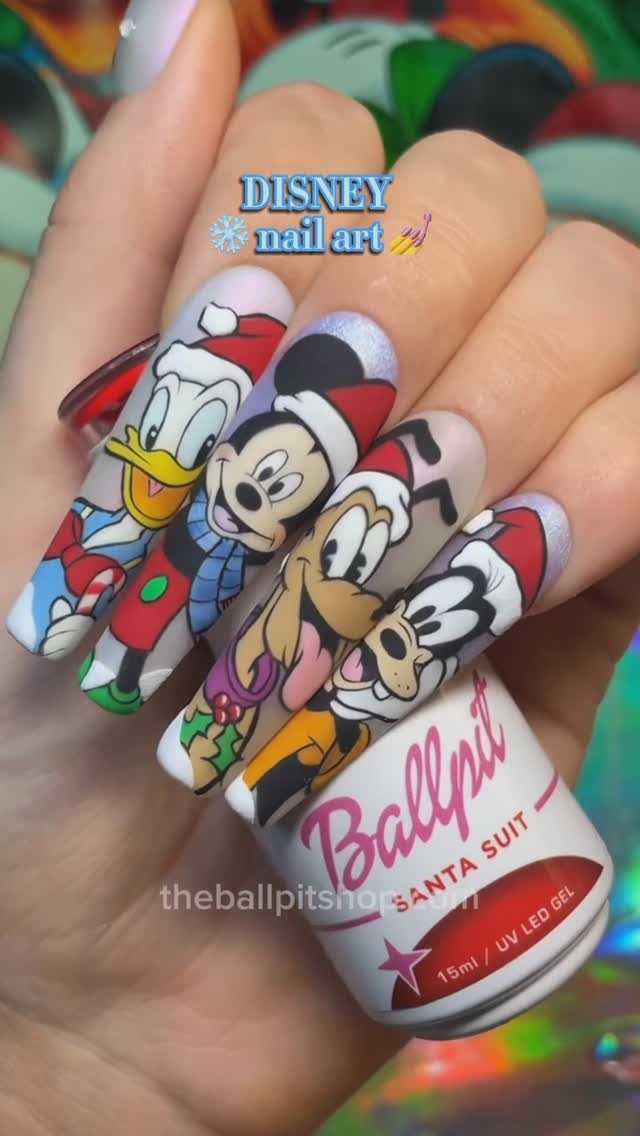
1. The Santa Hat Mickey. On a black or deep green base, paint a small red triangle on top of a Mickey head silhouette and add a white pom-pom and a band of white. It’s the single most recognizable Disney Christmas nail design, and it’s easy once you have a dotting tool.
2. Mickey Ornaments. Draw a thin gold line hanging from the top of the nail and finish it with a Mickey-head shape in red, silver or green, as if it were a bauble on a tree. Repeat across three nails in different colors for a tiny ornament garland.
3. Minnie Bow and Holly. Paint a polka-dot bow in classic red with white dots, then tuck a couple of holly leaves and three red berries behind it. This works especially well on a sheer pale-pink base for a softer look.
4. Candy Cane Mickey. Make the ears with a red-and-white swirl instead of solid black. It’s an easy way to blend Disney with a very Christmassy candy motif, and it looks great paired with a plain white accent nail.
5. Buffalo Plaid Mickey. Create a red-and-black buffalo plaid base using a thin brush or a stamping plate, then top one nail with a bold black Mickey silhouette. The pattern is cozy cabin vibes, and the silhouette stops it from feeling too busy.
6. Snowflake Mickey. Fill a white Mickey head with a tiny silver or pale-blue snowflake pattern. On a deep navy base, this looks like a Mickey head stamped out of snow.
7. Mickey Light Strings. Paint a thin line across the top third of each nail and hang small ear-shaped “bulbs” in red, green, yellow and blue. It’s a very cute nod to a string of Christmas lights, and one of the best designs for showing off a full set.
8. Ugly Sweater Mickey. Texture is the secret here. Use a fine brush to paint tiny knit-style V shapes in red and white, add a Mickey head in the center and finish with a matte top coat for a wool-like look. It’s playful, and it photographs very well.
Pro tip: Black detail work always looks sharper over a light base, so if your Mickey outlines keep bleeding into dark polish, put a white or cream underlayer first.

Frozen-Inspired Christmas Nails (6 Ideas)
Snow, ice, a talkative snowman and a lot of glitter. Frozen-inspired nails are some of the most popular Disney winter designs because the color story practically paints itself.
1. Olaf Accent Nail. On a pale-blue base, paint a round white snowman with a tiny carrot nose, twig arms and a few dots for buttons. Add a dusting of white glitter at the bottom and call it a day. Olaf is the friendliest design in this guide, and one of the easiest.
2. Elsa’s Snowflake. A single large, fine-lined snowflake on a sheer icy base looks elegant and delicate. Use a striping brush and a silver or white polish, and finish with a few tiny rhinestones in the center.
3. Mirror Chrome Ice. Apply chrome powder over a light blue or lilac base for a frosted, mirror-like finish. Pair with a couple of nails of clear glitter gradient for a “frozen lake” effect.
4. Northern Lights Gradient. Blend teal, violet and pale blue softly from the cuticle to the tip, then add a few tiny star dots. It’s an easy sponge technique, and the result looks like an aurora. Perfect if you want a Disney feel without a literal character.
5. Sven the Reindeer. Paint a tiny set of antlers and a brown nose on a warm tan base, and add a little red ribbon to turn him into a holiday reindeer. It’s a sweeter, quieter alternative to the usual character choices.
6. Glitter Gradient “Let It Snow.” For people who don’t want to paint anything detailed, a white-to-clear glitter gradient with a few scattered snowflake decals is the speedy answer.
A quick styling note: Frozen-inspired looks pair especially well with long almond or coffin shapes, because the length gives the snowflakes room to breathe.

The Nightmare Before Christmas Nails (6 Ideas)
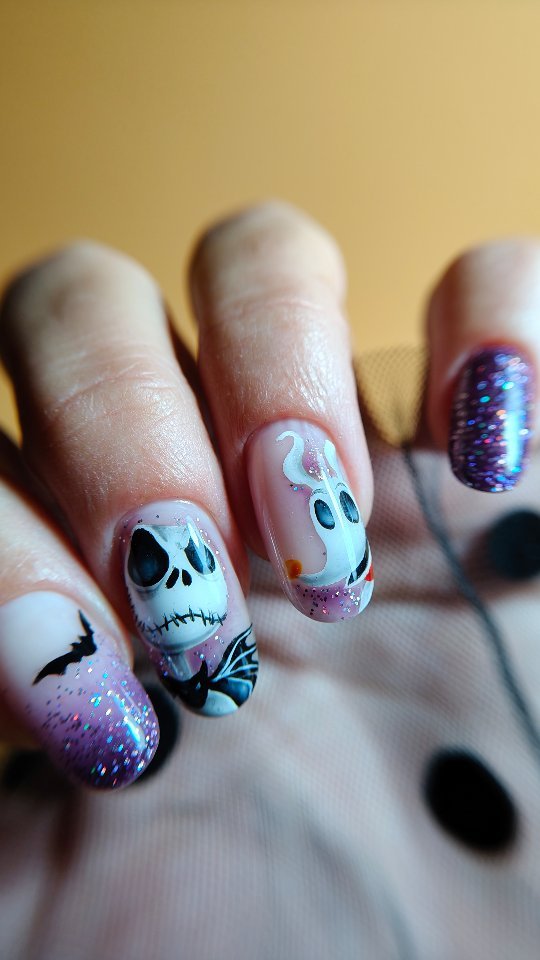
Is it a Halloween movie or a Christmas movie? Fans have been arguing for decades, and the beauty of Nightmare Before Christmas nails is that you don’t have to pick a side. The two holidays are blended right into the story, which makes this one of the most distinctive Disney Christmas nail themes.
1. Sandy Claws Jack. Paint a skeleton face on a white nail with two black eye hollows and a thin stitched smile, then top it with a red Santa hat. It’s the signature look, and it’s surprisingly beginner-friendly because the face is just simple shapes.
2. Spiral Hill. Paint a black-and-white spiral hill under a pale moon on a deep-blue or purple base. It’s a graphic design that works as a single accent nail and gives a big statement for very little effort.
3. Pinstripe Suit. Use a thin striping brush to draw fine white vertical lines on a black base, then add a tiny red bow tie at the base of the nail. It’s the most grown-up design in the set.
4. Sally’s Patchwork. Create a quilt of small squares in muted teal, dusty red, mustard and cream, with tiny stitched edges. The result looks like Sally’s dress, and it’s a lovely contrast to the black and white on your other nails.
5. Zero the Ghost Dog. Paint a floating white ghost dog with a small glowing red-orange nose on a dark base. Add a few snowflakes behind him to bring the Christmas side into the picture.
6. Candy Stripe and Bone. Alternate red-and-white candy cane stripes with tiny white bones across the nail. It’s a playful, slightly macabre way to merge both holidays on a single nail.
If you prefer glow effects, look for glow-in-the-dark top coats or special-effect polishes that charge under light. Several nail brands have released licensed Nightmare Before Christmas collections with themed colors and stickers over the years, so it’s worth checking current collections if you’d rather skip the freehand painting.

Also Read: Winter Nail Designs
Disney Princess Christmas Nails (6 Ideas)
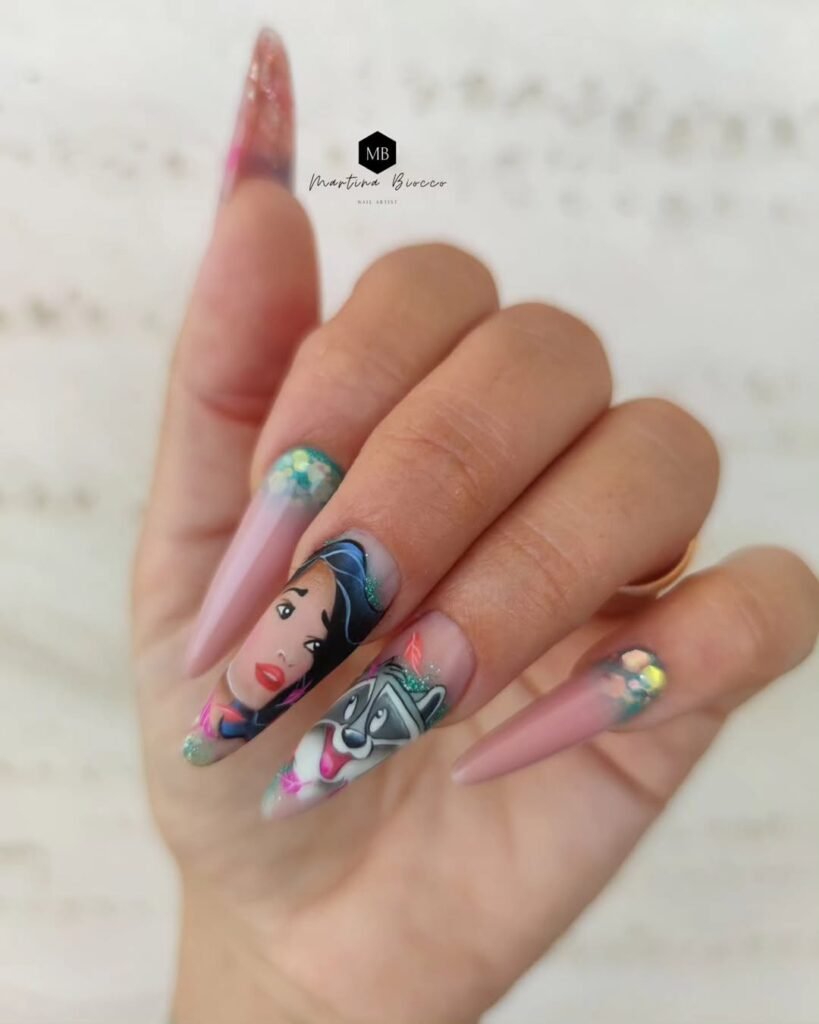
If your holiday aesthetic leans fairytale, princess-inspired nails are a natural fit. They’re about shimmer, softness and little storybook details rather than literal portraits.
1. Glass Slipper and Snowflake. On a sheer pale-blue base, paint a small slipper shape with a silver outline and fill it with fine glitter. Add a delicate snowflake beside it for the winter twist.
2. Enchanted Rose. A single red rose under a glass dome is a beautiful Belle-inspired accent. Paint it on a deep-gold or burgundy base and add a few falling petals. It’s romantic and elegant, and it suits almost any season.
3. Lantern Glow. For a Rapunzel-inspired look, paint a floating lantern in warm yellow and orange against a deep-blue night sky. Add tiny stars for a magical, glowing effect that looks stunning against a navy base.
4. Sleeping Beauty Pink and Blue. Blend a soft pink and a pale blue on alternating nails, then add a gold crown or a few sparkles. It’s a quiet reference to the classic color debate, and it’s very pretty.
5. Ocean Holiday. For an Ariel-inspired nail, use shimmering sea green with a small red-gold shell and a few pearl rhinestones. It’s a nice option if you want something less wintry.
6. Golden Ballroom. Paint a gold foil base with soft white-and-champagne gradient nails, then finish with a thin line of rhinestones near the cuticle. It feels like a holiday ball in a castle.
A good rule for princess nails: restraint reads as more expensive. A single beautifully executed accent nail beats five crowded ones.
Cozy Characters: Pooh, Stitch, Toy Story and More (8 Ideas)
Not everyone is a princess or a Mickey person, and the Disney universe is huge. Here are cozy, funny and sweet options for everyone else.
1. Winnie the Pooh Honey and Red. A warm honey-gold base with a small red top-shaped detail is a gentle nod to Pooh’s outfit. Add a tiny honey pot in brown and gold and you’ve got a design that’s all comfort.
2. Stitch in a Santa Hat. On a bright blue base, paint a round-eared blue character with large dark eyes and a white-trimmed red hat. It’s a fan favorite, and it’s adorable on a short square nail.
3. Lilo and Stitch Beach Christmas. For anyone who spends Christmas somewhere warm, try a turquoise base with a small palm tree and a string of colorful lights.
4. Toy Story Wrapped Gifts. Paint several tiny presents in cowboy-hat brown, red and spaceship green. It’s a subtle design that leans into the toy-box feeling.
5. Bambi Winter Meadow. A quiet snowy scene with a delicate pine silhouette and a small rabbit in the corner. It’s a lovely choice if you prefer natural, calm designs.
6. Donald’s Holiday Sailor Hat. A little blue sailor hat with a red bow on a white base is both funny and instantly recognizable.
7. Chip and Dale Acorn Ornaments. Brown acorns with tiny red ribbons look like woodland ornaments. This is a subtle option if you want a design that’s clearly Disney to fans but just festive to everybody else.
8. Tinker Bell Frost. A fine gold-and-green glitter gradient with a small star near the cuticle is a gentle, sparkly nod to the pixie.
Subtle and Minimalist Disney Christmas Nails (8 Ideas)
Sometimes the best Disney nails are the ones only another fan notices. If you work in an office, attend a formal gathering or just prefer a quieter look, these designs are for you.
1. The Hidden Mickey. Use three tiny circles in a Mickey formation as a negative-space design in the corner of a nail. It’s the ultimate easter egg.
2. Tiny Ears on a French Tip. Instead of a plain smile line, turn the tip into a small ear shape on a single finger. It’s subtle and cute.
3. Gold Star Constellation. Sprinkle small gold stars across a navy or burgundy base. It’s the “When You Wish Upon a Star” mood with zero character art.
4. Castle Silhouette. A small, thin outline of a castle in gold or silver at the base of a nail, against a deep-blue gradient, looks elegant and almost architectural.q
5. Sheer Red with Ear Dots. Use a sheer red jelly polish and add two small black dots and a larger one on one accent nail. It’s understated, glossy and very Christmassy.
6. Champagne Glitter with a Single Bow. A nude or champagne base, a hint of shimmer and one tiny bow on the ring finger gives you a Minnie nod without any bold color.
7. Velvet Matte Green and Gold. A matte forest green with a metallic gold ear silhouette is quietly luxurious.
8. Snowy Fingertips. A sheer base with a light white speckle at the tips reads as falling snow. Add a small Mickey ear shape on one nail and you’re done.
If you’re unsure whether you’ll like the look, a single accent nail is the best low-risk place to begin.
Best Nail Shapes and Lengths for Disney Christmas Nails
The same Mickey silhouette can look completely different depending on the canvas. Before you commit to a design, match it to a shape.
- Short square or squoval: Best for beginners and for kids. Small, simple designs like a single Mickey, a snowflake or a gold star sit neatly on a short nail, and short nails survive typing, theme-park queues and gift wrapping.
- Short to medium round: A soft, friendly shape that suits subtle looks like the hidden Mickey or a tiny bow.
- Medium almond: The all-rounder. It gives enough space for a full character while keeping a delicate, elegant outline. This is a great choice for Frozen-inspired and princess nails.
- Medium to long coffin or ballerina: Wide, flat tips are perfect for detailed scenes like a snowy meadow or a spiral hill. They’re dramatic, so keep the other nails simple.
- Long stiletto: Very bold. It suits Nightmare Before Christmas pinstripes beautifully, but it isn’t the most practical shape for a busy holiday week.
A useful rule: the smaller the nail, the simpler the design. If you only have a short nail bed, pick one clear shape per nail instead of crowding it with scenery.
How to Paint Mickey Christmas Nails at Home (Step by Step)
You don’t need to be an artist to pull this off. You need three round shapes, a steady breath and a little patience. This tutorial creates the classic Santa Hat Mickey on a deep green base.
What you’ll need
- Base coat and top coat
- Deep green (or red, black or navy) polish for the base
- Black polish or gel for the silhouette
- Red and white polish for the hat
- A dotting tool set (a small and a medium tip) or a clean ballpoint pen
- A thin striping or detail brush
- Nail polish remover and a small cleanup brush or cotton swab
- A piece of foil or a palette to hold small blobs of polish
The steps
- Prep your nails. Push back the cuticles, buff the surface lightly and wipe each nail with remover so the polish grips.
- Apply your base coat. It protects your natural nail and helps the color last longer.
- Paint two coats of your base color. Let each coat dry properly. Rushing here is the number one reason designs smudge.
- Plan your placement. Decide where the Mickey will go. A slightly off-center position at the base of the nail looks modern and avoids the awkward “sticker in the middle” feeling.
- Make the head. Put a blob of black polish on your foil. Dip the medium dotting tool and press one large dot onto the nail. This is the face.
- Add the ears. With the small dotting tool, place one dot at the upper left and one at the upper right of the head, slightly overlapping the face. Let the shape dry for a minute before moving on.
- Add the hat. Using your detail brush, paint a small red triangle that sits on top of the head. Add a thin white band along the base and a tiny white dot at the point.
- Clean up the edges. Dip your cleanup brush in remover and sharpen any wobbly lines around the silhouette. This step is what makes it look professional.
- Seal it in. Once everything is completely dry, apply a generous coat of top coat. If you’re using regular polish, re-apply a thin layer of top coat every two days to keep it glossy.
Tips from the nail desk
- Work with tiny amounts of polish. Too much and the shapes blob.
- Use a tape stencil or a sticker as a guide if you’re nervous about freehand.
- Practice on a piece of paper or an old press-on first.
- If the dots look uneven, wait until the polish is dry and fix them with a second, thinner pass.
Gel, Press-Ons, Dip Powder or Regular Polish: What Should You Choose?
The finish you pick affects how long your design lasts, how detailed it can be and how easy it is to remove. Here’s a quick comparison.
| Finish | Typical wear | Best for | Watch out for |
|---|---|---|---|
| Regular polish | A few days to about a week | Quick DIY and kids | Chips easily, needs frequent top coat |
| Gel polish | Around two to three weeks | Detailed art that stays crisp | Needs a UV or LED lamp, careful removal |
| Press-on nails | Roughly one to two weeks, depending on glue | Beginners, events, trying designs | Fit and glue choice matter |
| Dip powder | Around three to four weeks | Sturdy, long-wearing sets | Can look thick on small nail beds |
| Acrylic or hard gel extensions | Three to four weeks with fills | Length and complex 3D designs | Higher cost, requires a skilled tech |
If you’re a beginner, press-ons are an excellent starting point. You can paint or decorate them at your own pace at the kitchen table, then apply them in minutes. For complicated Disney Christmas nails like the Nightmare Before Christmas pinstripes or full Frozen scenes, gel is the easiest medium for crisp, long-lasting lines.
Also Read: Baby Blue Winter Nails
Salon or DIY? How to Get Exactly What You Want From Your Nail Tech
Doing your own nails is fun and budget-friendly. A salon is worth it when you want precise detail, a long-lasting finish and a set that feels like a finished piece of jewelry. If you’re going the salon route, a little preparation goes a long way.
- Book early. The weeks before Christmas are the busiest time of the year for nail artists, and detailed art takes longer. Book a longer appointment than usual and ask for the art time to be included.
- Bring clear reference photos. Two or three images of designs you love, plus a picture of your outfit or a color you want, will save everyone a lot of confusion.
- Say “Disney-inspired.” Many technicians are happy to create character-inspired designs, but some prefer not to reproduce exact copyrighted artwork. Describing the elements you love (round ears, a red hat, a snowflake) is often the easiest way to get the look you want.
- Be honest about your budget. Ask for a quote before you sit down. Nail art is usually priced per nail or per design, so you can choose whether to decorate every nail or just two accent nails.
- Talk about wear and tear. If you type all day, use your hands for work or are heading to a theme park, tell your tech. They can recommend a shape, length and finish that suit your lifestyle.
A good nail tech will also tell you when a design won’t work. If they suggest simplifying a detail, that’s usually because the idea will look better and last longer.
Disney Christmas Nails for Kids: Safe, Simple and Fun
Kids tend to love character nails even more than adults do, and it’s a lovely activity to share. Just keep a few things in mind.
- Choose gentle products. Look for water-based, peel-off polishes or nail stickers made specifically for children. Avoid strong-smelling products and always follow the label.
- Keep it short and simple. Short, rounded nails are more comfortable, less likely to snag and easier to keep tidy.
- Skip adult-only products. Gel lamps, acrylics, dip powder and strong removers are not designed for children. Press-on kits made for kids or peel-off stickers are a better fit.
- Avoid tiny, loose decorations. Rhinestones, small beads and other fiddly pieces can come off and become a choking hazard for younger children. Painted designs and flat stickers are safer.
- Ventilate and supervise. Paint in a well-aired room and keep polishes and removers out of reach when you’re done.
- Remove gently. For peel-off polish, simply peel. For stickers, a little oil softens the adhesive. Don’t pick or tug at the nail.
Easy kid-friendly ideas include a big Mickey-ear dot on each nail, Olaf stickers, red-and-white candy stripes and a glitter gradient. Let them choose the color and the character, and let the result be a little wonky. That’s half the charm.
Wearing Disney Christmas Nails at the Theme Parks
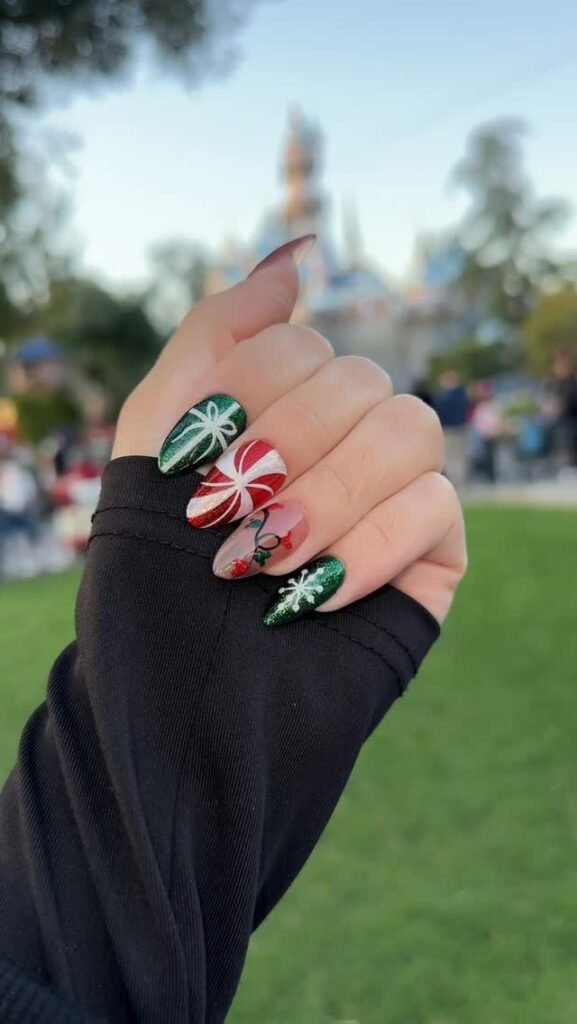
If you’re planning a holiday visit to a Disney park, nails are one of the easiest ways to match the atmosphere. Parks are decorated with lights, garlands and trees through the festive season, and a themed manicure fits right in. A few practical tips:
- Pick a durable finish. Gel, dip or a well-applied press-on will cope better with a long day of walking, wet rides and constant handwashing than regular polish.
- Go shorter. Long nails and roller-coaster restraints, bag zippers and phone cases don’t always get along. Short to medium length is more comfortable.
- Plan the timing. Get your nails done two to four days before you travel, so the finish is fresh and the design looks perfect in photos, but you’re not stressing over a last-minute appointment.
- Coordinate with your outfit. A red Minnie-bow nail looks fantastic with a plaid shirt or a classic ear headband. Keep your color palette to two or three tones across clothes and nails so the look feels intentional.
- Think about your photos. Matte finishes can look dull in bright sun. A glossy top coat or a touch of shimmer catches the light and looks great in castle-and-tree shots.
- Pack a nail kit. A small bottle of top coat, a file and a few spare press-ons weigh almost nothing and can save the day.
- Moisturize. Hand sanitizer and constant washing dry out the skin around your nails. Keep a small tube of hand cream and cuticle oil in your bag.
Also Read: Fall Dip Nail Ideas
How to Make Your Disney Christmas Nails Last
A great design deserves a long life. These habits make a difference.
- Seal the edges. When you apply top coat, run the brush along the free edge of the nail to cap it. That tiny step prevents most early chipping.
- Wear gloves for chores. Washing dishes and cleaning products are the biggest enemies of nail art.
- Use your fingertips, not your nails, as tools. Don’t open cans, peel tape or scrape labels.
- Keep cuticle oil handy. Hydrated nails flex rather than crack, and the oil keeps the skin around the design looking neat.
- Refresh with top coat. If you’re wearing regular polish, add a thin new layer every two to three days.
- Remove properly. Don’t peel gel or press-ons off the nail. Soak off gel according to the product instructions, and loosen press-ons with warm soapy water and a little oil. Afterward, rest your nails and moisturize.
If your design starts to lift or a nail breaks, fix it right away rather than waiting. A tiny repair now stops a bigger one later.
Final Thoughts: Bring a Little Magic to Your Fingertips
The best thing about Disney Christmas nails is how flexible they are. You can go all out with a full set of Mickey ornaments and Olaf snowmen, or you can whisper it with a single hidden Mickey on a champagne gold nail. You can paint them in your kitchen with a dotting tool and a cup of cocoa, or book a long appointment with a talented nail artist. You can wear them to a family dinner, an office party or a day at a theme park.
Start small. Pick one palette, one character world and one accent nail, and build from there. By the time the holidays roll around, you’ll have a favorite look and a few more ideas for next year.
Which Disney Christmas nail design are you trying first? Save this guide, share it with a fellow fan and give your hands a little magic this season.
Frequently Asked Questions
What are the easiest Disney Christmas nails for beginners?
Start with designs built from dots and simple shapes. A Mickey silhouette made from three circles, a Santa hat triangle, a candy-cane stripe, a snowflake sticker or a single gold star accent are all beginner-friendly. Press-on nails and nail stickers are also a low-pressure way to try the look.
How long do Disney Christmas nails last?
It depends on the finish. Regular polish usually lasts a few days to a week, press-ons around one to two weeks, gel roughly two to three weeks and dip powder or acrylics often three to four weeks. Good prep, sealed edges and wearing gloves for chores extend the life of any manicure.
Can I get Disney Christmas nails at a nail salon?
Yes. Many nail artists create Disney-inspired Christmas designs, especially during the holiday season. Book early, bring reference photos and describe the elements you want, such as round ears, a Santa hat or snowflakes. Some technicians prefer to make inspired designs instead of exact copies of official artwork.
How much do Disney Christmas nails cost?
Prices vary widely by city, salon, finish and the complexity of the art. Most salons charge for the base service (like a gel manicure) and add a per-nail or per-design fee for character art. Ask for a quote before your appointment, and consider decorating just two or three accent nails to keep costs down.
What colors work best for Disney Christmas nails?
Classic red, green and white are the safest choice, especially for Mickey and Minnie designs. Icy blues and silver suit Frozen-inspired looks, black, white and red work for Nightmare Before Christmas, and blush pink with champagne gold suits princess-style nails. Choose a main color, a supporting color and one metallic for the most polished result.
Are Disney Christmas press-on nails worth it?
Press-ons are a great option if you want a quick, reversible look or you’re not confident painting detail. Choose a good fit, prep your nails properly and use quality adhesive. If you want a specific character design, look for licensed products from reputable brands, or decorate plain press-ons yourself.
Is it safe for kids to wear Disney Christmas nails?
It can be, with the right products. Choose peel-off or water-based polishes and flat stickers made for children, keep nails short, avoid small loose decorations that could be a choking hazard and supervise the process. Skip adult products like gel lamps, acrylics and strong removers. If your child has sensitive skin or a medical condition, check with a doctor first.
Will my Disney Christmas nails survive a theme-park trip?
They can, if you plan ahead. Choose a durable finish like gel or dip, keep your nails short to medium length and get them done a few days before you travel. Pack a small kit with top coat, a file and hand cream, because frequent handwashing and sanitizer can dry out the skin around your nails.
What if I can’t draw? How can I do Disney Christmas nails without freehand art?
There are plenty of ways. Nail stickers and water decals do the detail work for you, stamping plates transfer ready-made shapes, and a simple dotting tool gives you perfect circles for Mickey ears. You can also use a nude base with tiny gold stars or a glitter gradient for a Disney-inspired look with no drawing at all.
How do I remove Disney Christmas nail art safely?
For regular polish, use remover and a cotton pad. For gel, follow the product instructions, which usually involve filing the top coat and soaking with acetone-soaked cotton wrapped in foil. For press-ons, soak in warm soapy water and gently loosen the edges. Never peel or pry them off, since that can damage the nail. Finish with cuticle oil and a rest period of a few days.